Life’s too short to deploy printers
That’s why we created the Enhanced Deployment Project
Streamline, simplify, and speed up the deployment of large fleets.
Bulk deployment enables easy fleet installations in a flash.
Feature history:
- Enhanced MFD Deployment on 20.0 – Feature update now allows the CSV file to be imported via the admin console UI, in addition to supporting adding staged MFDs prior to their delivery
How-to guides
Enhanced MFD Deployment gives user the freedom to pre-configure up to 999 devices using a single CSV file.
The user can choose to either deploy the devices immediately to the server (since 19.1), or stage them for deployment later (since 20.0).
Enhanced MFD Deployment also enables the user to stage or deploy the devices via PaperCut UI (since 20.0)
Stage/Deploy MFDs via PaperCut UI
1. Download a template CSV file through PaperCut UI
- Log into PaperCut MF as an admin user.
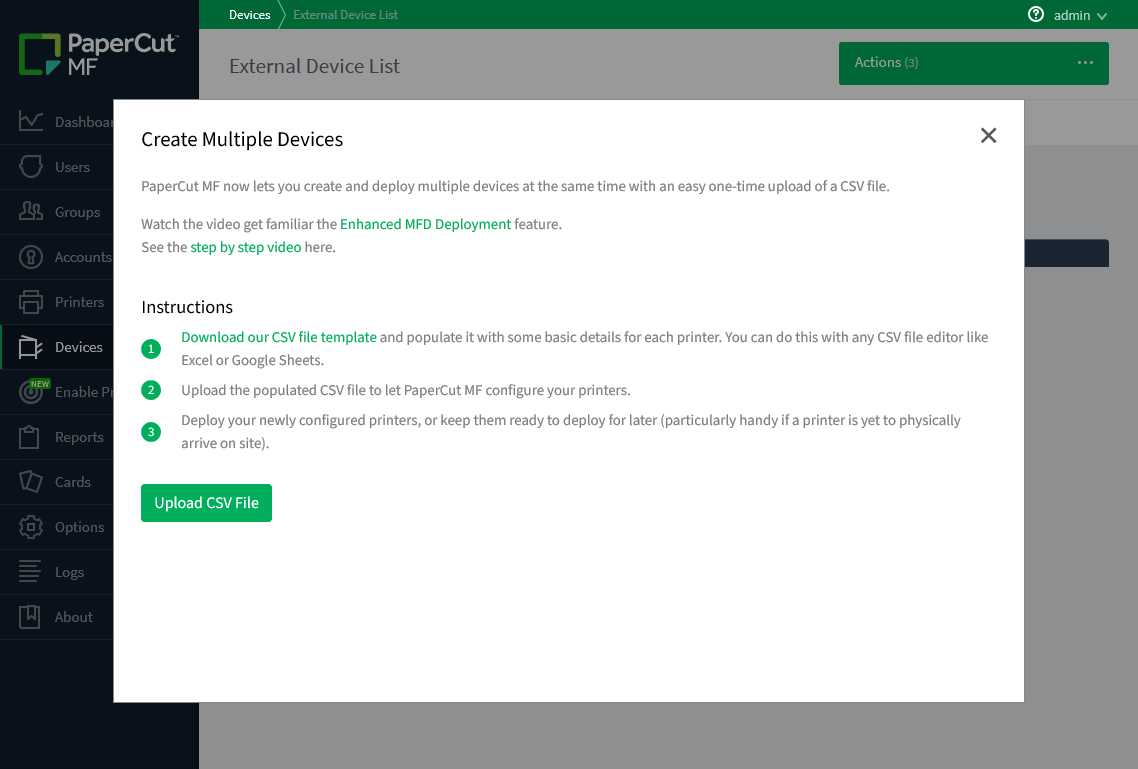
- Click the ‘Devices’ tab to navigate to the ‘External Device List’ page.
- From the ‘Actions’ menu, click ‘Create multiple devices’.
- Click the ‘Download our CSV file template’ link.
2. Follow below platform specific step to fill out the CSV template
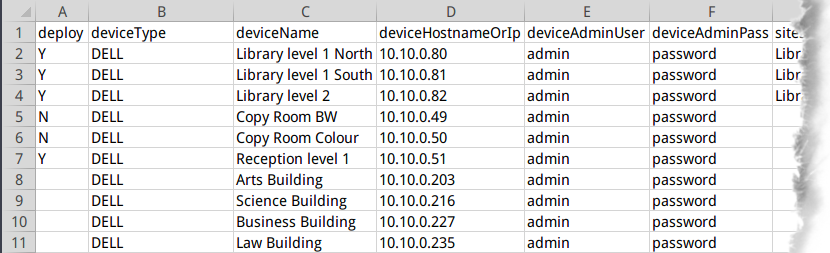
- Dell (AIP)
- Set the ‘deviceType’ column as ‘DELL’ as pictured in the example CSV below.
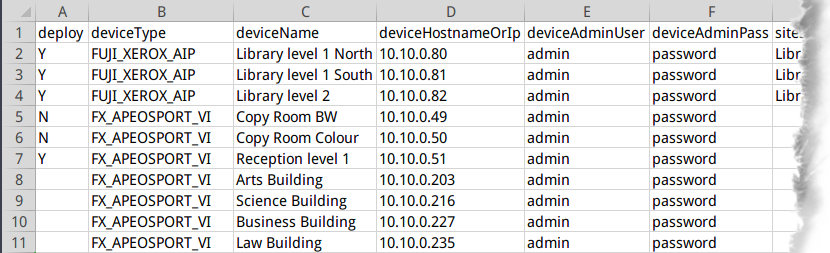
- Fuji Xerox AIP (legacy) and Fuji Xerox ApeosPort V+ (AIP)
- Set the ‘deviceType’ column as ‘FUJI_XEROX_AIP’ or ‘FX_APEOSPORT_VI’ as pictured in the example CSV below.
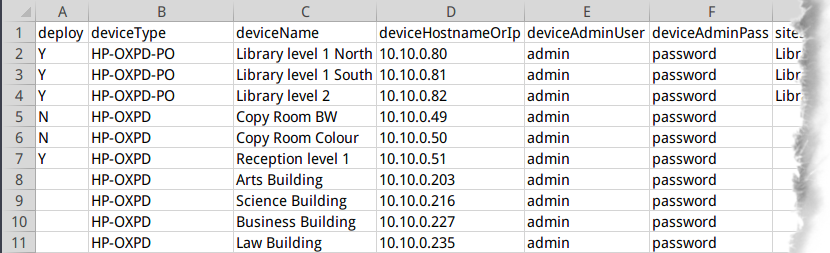
- HP OXP and HP OXP (Printer Only)
- Set the ‘deviceType’ column as ‘HP-OXPD’ or ‘HP-OXPD-PO’ as pictured in the example CSV below.
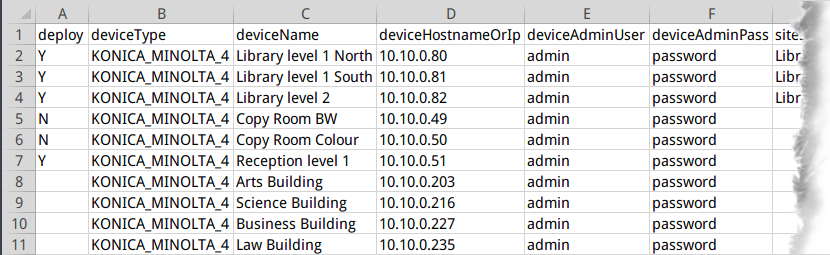
- Konica Minolta (OpenAPI 4.0+)
- Set the ‘deviceType’ column as ‘KONICA_MINOLTA_4’ as pictured in the example CSV below.
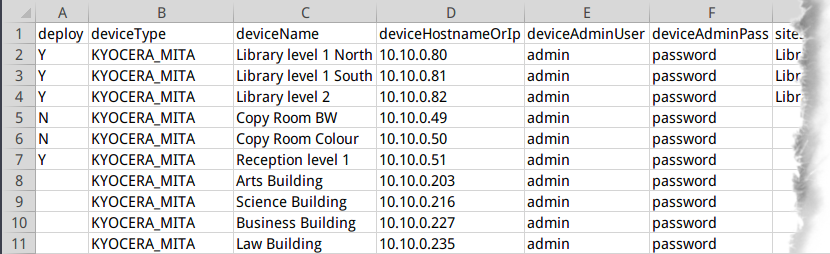
- Kyocera (HyPAS)
- Set the ‘deviceType’ column as ‘KYOCERA_MITA’ as pictured in the example CSV below.
 Please note:
- Although Kyocera (HyPAS) devices can be deployed immediately to Site Servers, staging is not supported.
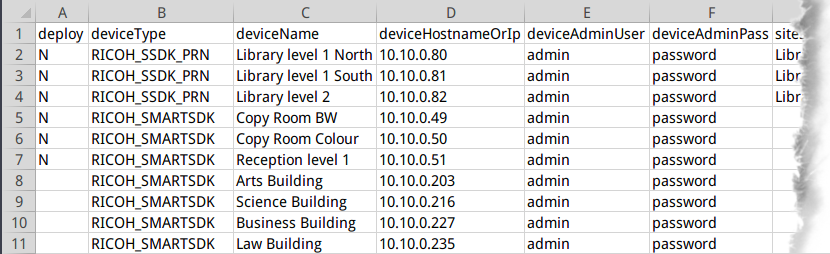
- Ricoh Smart SDK and Ricoh Smart SDK (Print Only)
- Set the ‘deviceType’ column as ‘RICOH_SMARTSDK’ or ‘RICOH_SSDK_PRN’ as pictured in the example CSV below.
 Please note:
- Ricoh Smart SDK and Ricoh Smart SDK (Print Only) devices can only be deployed from the device, not the PaperCut MF UI.
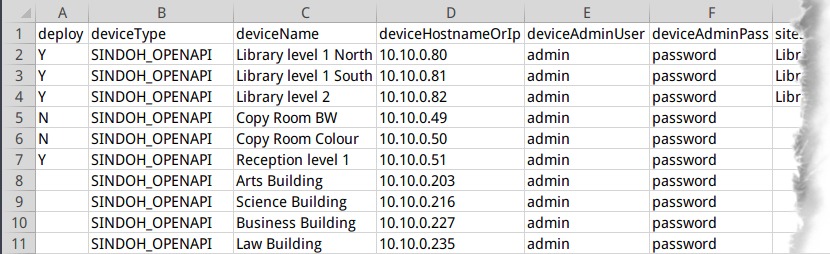
- Sindoh (OpenAPI 4.0+)
- Set the ‘deviceType’ column as ‘SINDOH_OPENAPI’ as pictured in the example CSV below.
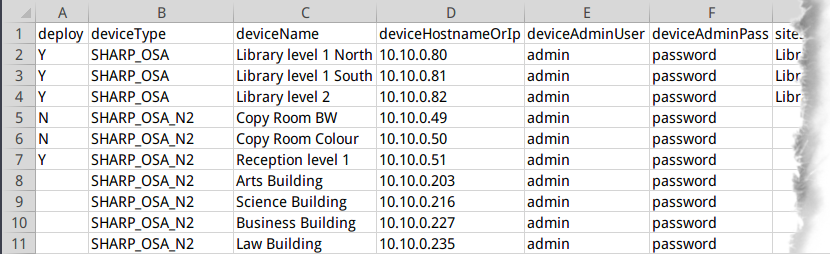
- Sharp OSA (3.5) and Sharp OSA N2 (HTML Browser n2.0+)
- Set the ‘deviceType’ column as ‘SHARP_OSA’ or ‘SHARP_OSA_N2’ as pictured in the example CSV below.
 Please note:
- Although Sharp OSA (HTML Browser n2.0+) and Sharp OSA devices can be deployed immediately to Site Servers, staging is not supported.
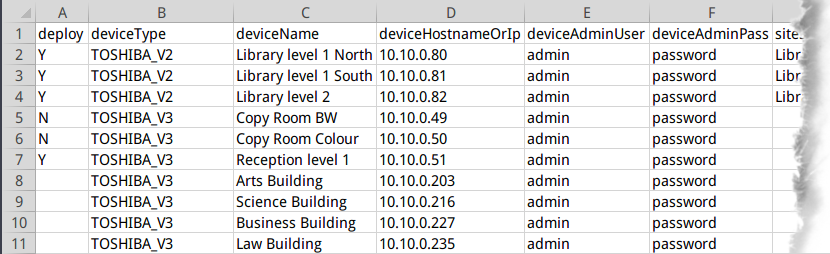
- Toshiba v2 and Toshiba v3+
- Set the ‘deviceType’ column as ‘TOSHIBA_V2’ or ‘TOSHIBA_V3’ as pictured in the example CSV below.
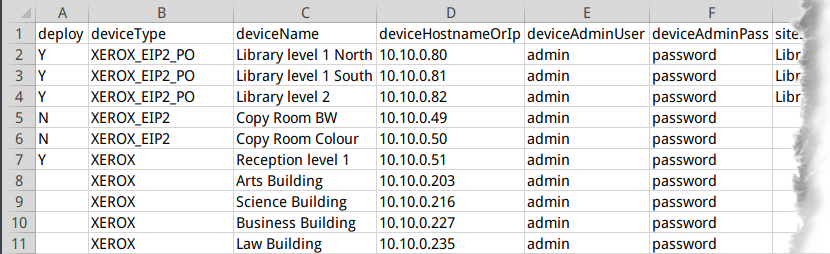
- Xerox (Network accounting / JBA), Xerox Secure Access EIP 1.5+ and Xerox Secure Access EIP 1.5+ (Print Only)
- Set the ‘deviceType’ column as ‘XEROX’, ‘XEROX_EIP2’ or ‘XEROX_EIP2_PO’ as pictured in the example CSV below.
3. Upload the CSV filled out with following steps
- Log into PaperCut MF as an admin user.
- Click the ‘Devices’ tab to navigate to the ‘External Device List’ page.
- From the ‘Actions’ menu, click ‘Create multiple devices’.
- Click the ‘Upload CSV File’ button.
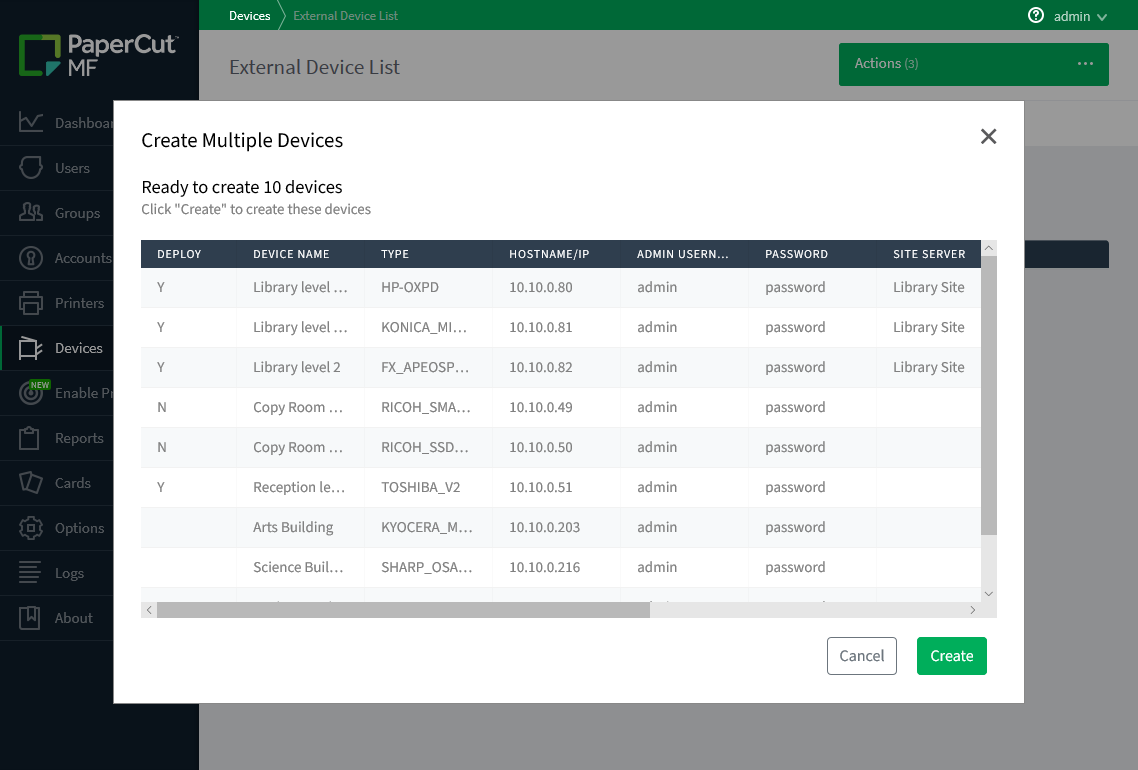
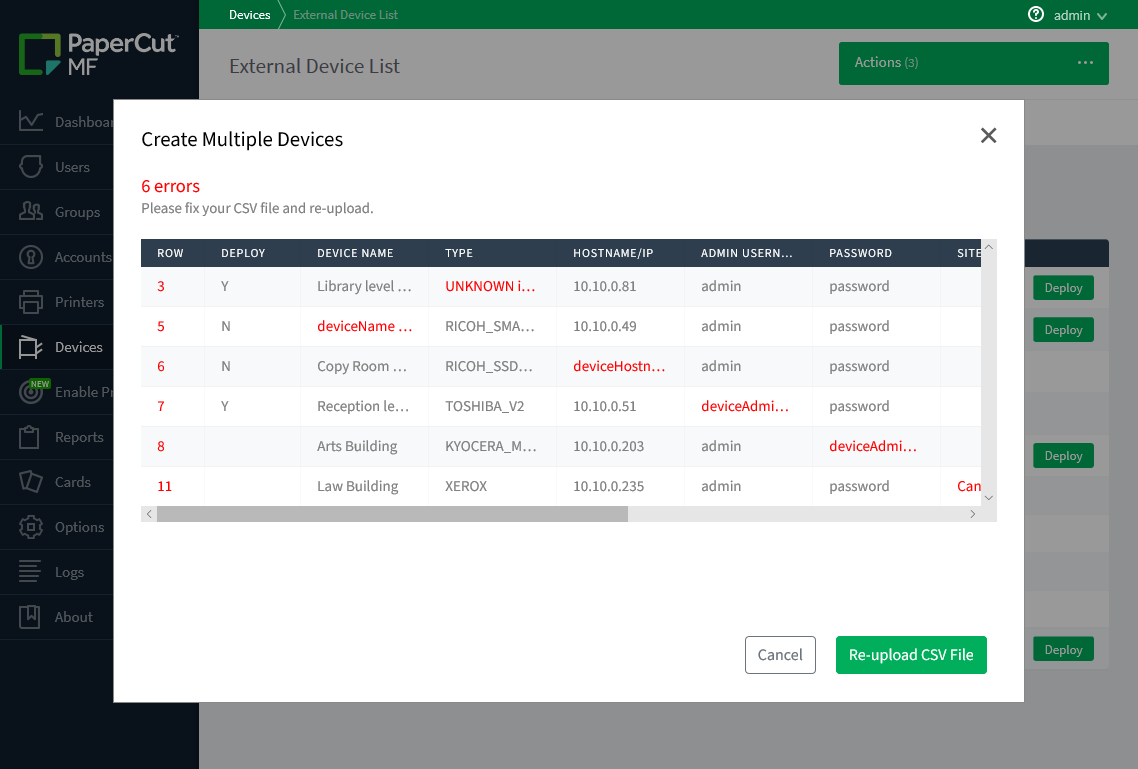
3.1 Review CSV rows
Please review your CSV rows in the CSV preview table.
You can also increase the width of each column by dragging the column header.
3.2 Review any error or mistake
A CSV errors table will be displayed if any row contains invalid data.
Please follow the red marked error messages to fix your CSV file and reupload.
4.1 Create the devices specified in your CSV file
Please click ‘Create’ button to start the device creation process.
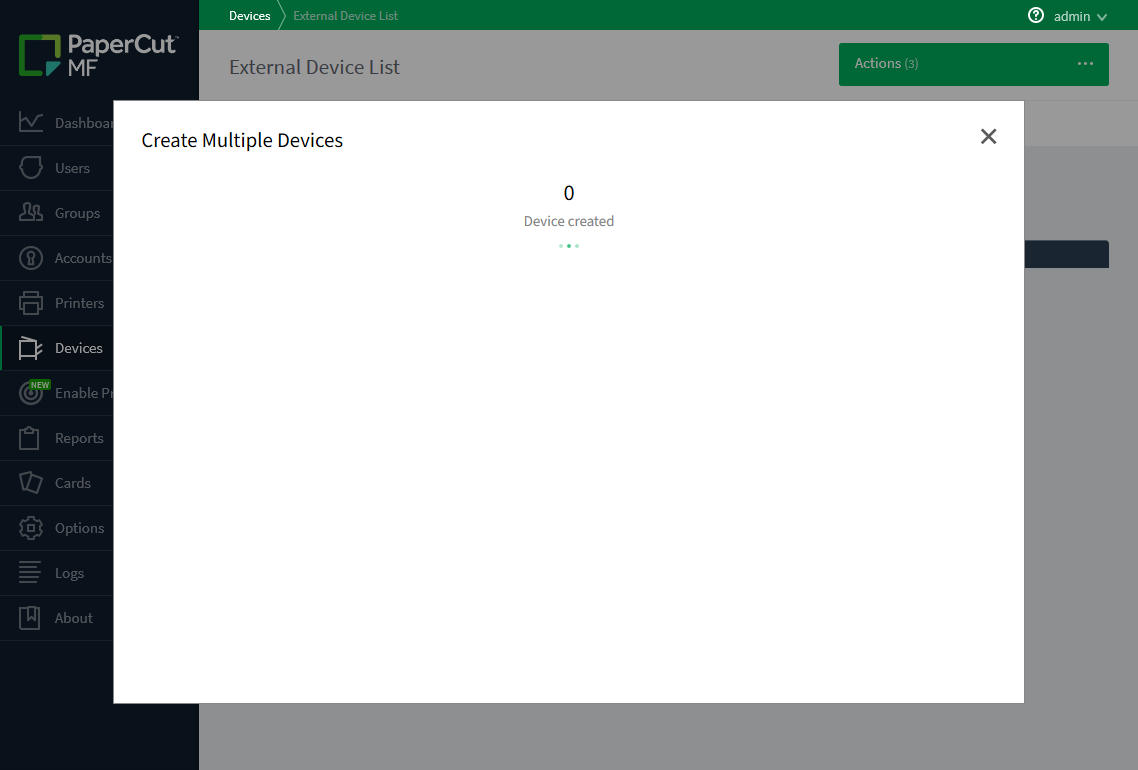 Once the process goes through successfully, you can close the wizard.

4.2 Review any error or mistake
A device creation failure table will be displayed if any failure encountered during device creation.
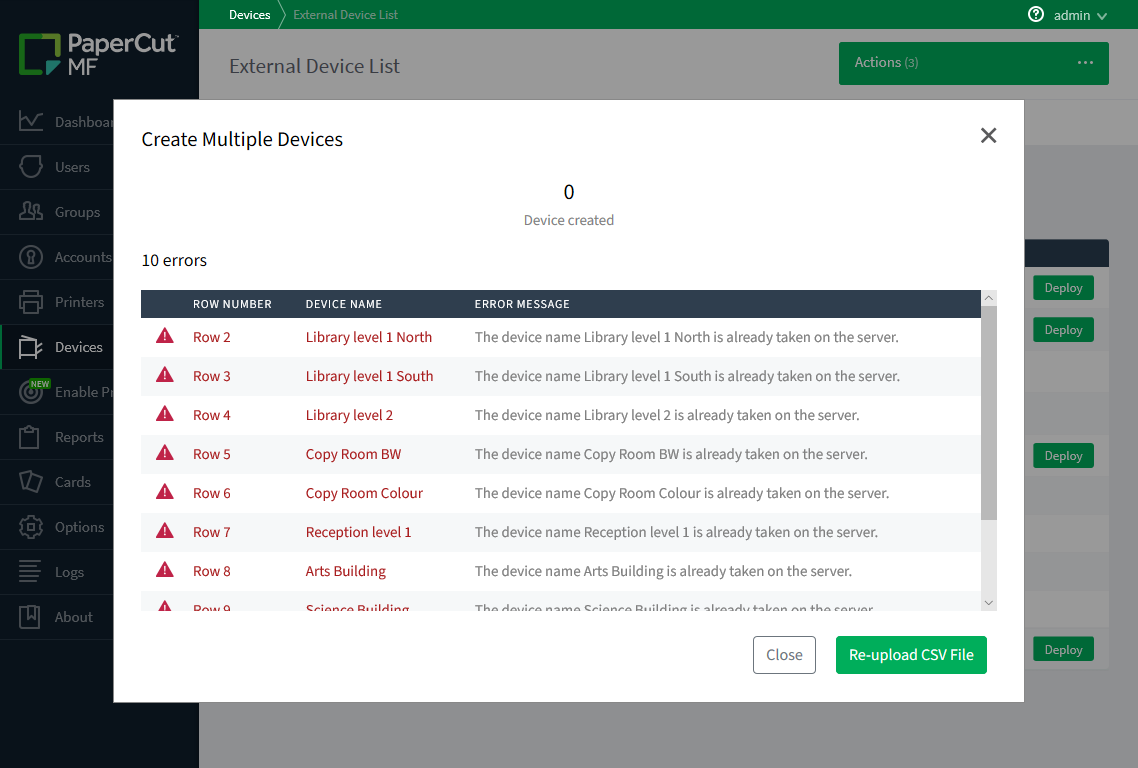 Please review your CSV file, fix any issue and reupload again.
5. Your devices have been successfully created
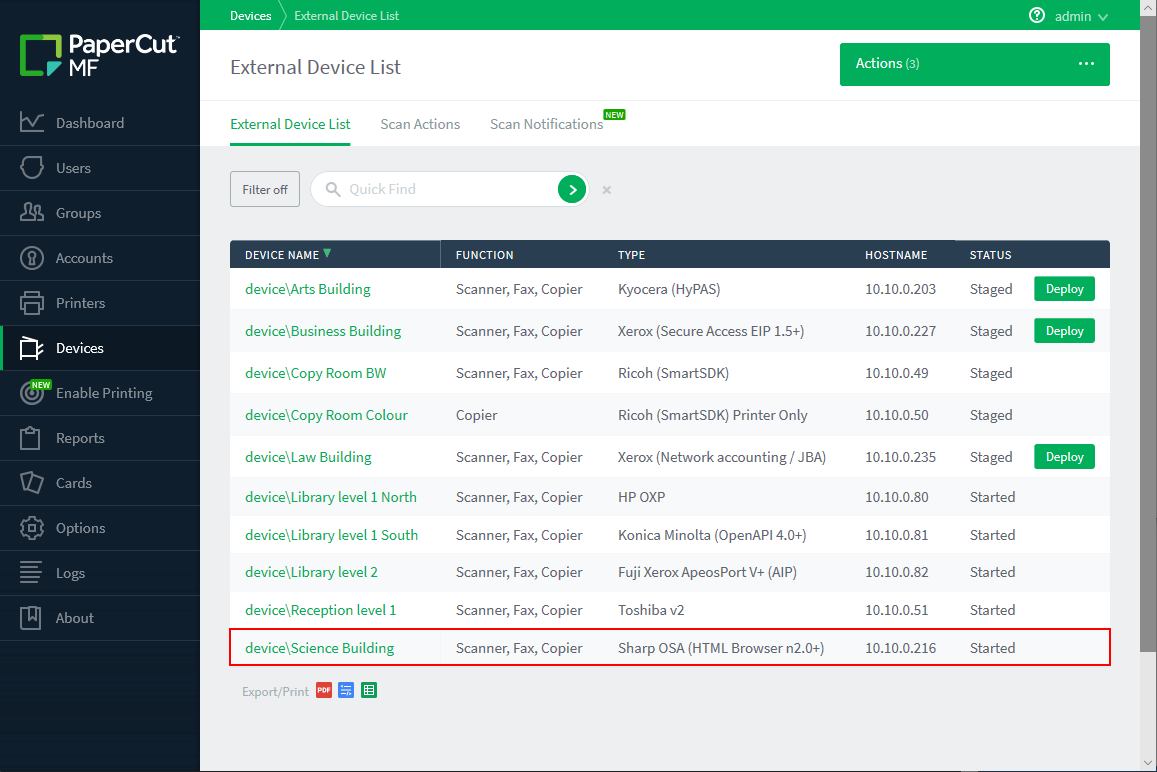
You can check the status of the devices in the ‘External Device List’ page.
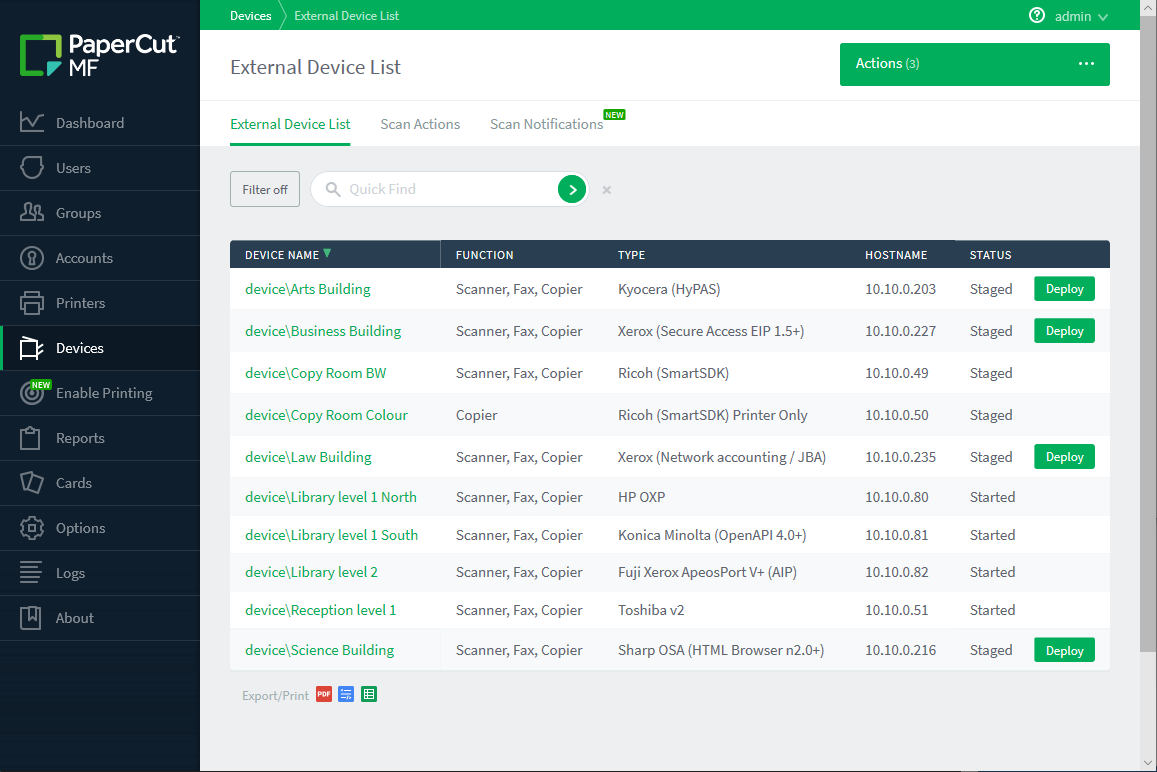
6. Deploy staged devices
Whenever a staged device is available in your network, you can click the ‘Deploy’ button to initiate the device deployment process.
Once the deployment process finishes, the status of the device will be changed from ‘Staged’ to ‘Started’. (Take the ‘Science Building’ device for an example.)
Stage/Deploy MFDs via server commands
- Kyocera
-
1. Make sure the PaperCut embedded application is installed on your devices.
You can double-check this with the KYOCERA Net Viewer tool.
Please note:
- Although this step is not required when you creating a staged Kyocera device, make sure the PaperCut embedded application for Kyocera is installed when deploying the staged device or deploying a device immediately through the CSV file.
2. Configure the CSV device list.
Set the ‘deviceType’ column as ‘KYOCERA_MITA’ as pictured in the example CSV below.
A template CSV file can be found at ‘{PAPERCUT_MF_DIRECTORY}\server\deployment\batch\batch-devices.csv’
Please note:
- Although Kyocera (HyPAS) devices can be deployed immediately to Site Servers, staging is not supported.
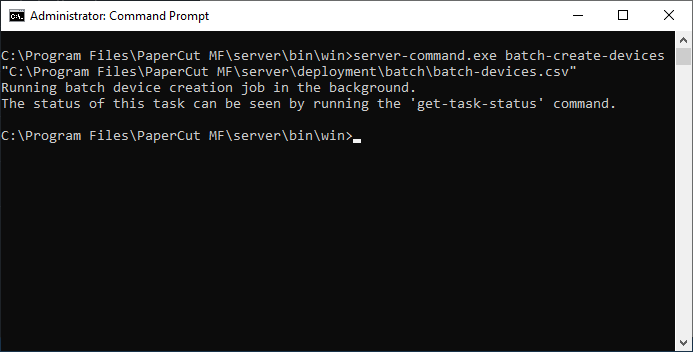
3. Begin device creation by running batch-create-devices in the server command.
This will kick off the device creation process, and should only take a few minutes per device (staged devices are much quicker). Running the command prompt as an administrator should avoid any issues.
C:\Program Files\PaperCut MF\server\bin\win\server-command.exe batch-create-devices “C:\Program Files\PaperCut MF\server\deployment\batch\batch-devices.csv”
4. Check device creation progress with the get-task-status command. (OPTIONAL)
This will show you how the device creation job is progressing printer by printer (see an example in the image below).
C:\Program Files\PaperCut MF\server\bin\win\server-command.exe get-task-status

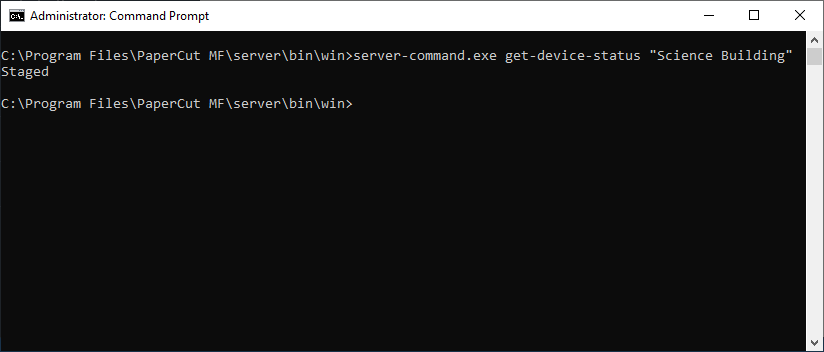
5.1 Check device status with the get-device-status command. (OPTIONAL)
This will displays any message normally found in the ‘Device Details > Status’ field.
C:\Program Files\PaperCut MF\server\bin\win\server-command.exe get-device-status {DEVICE_NAME}
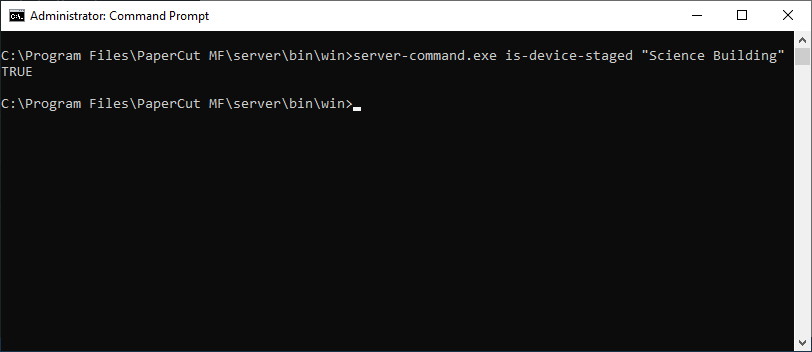
5.2 Check if the device is staged with the is-device-staged command. (OPTIONAL)
This will displays TRUE if the device is staged, and FALSE if the device is deployed.
C:\Program Files\PaperCut MF\server\bin\win\server-command.exe is-device-staged {DEVICE_NAME}
6. Deploy staged device with the deploy-staged-device command.
Now your devices have been created and deployed if the ‘deploy’ column was set to ‘Y’ or ‘y’.
If the device is staged and you want to deploy it, please use the deploy-staged-device command.C:\Program Files\PaperCut MF\server\bin\win\server-command.exe deploy-staged-device {DEVICE_NAME}

7. Success!
Your devices have been created in record time and ease. Each device is now listed in your PaperCut Application Server’s Device List.

- Sharp
- HEADS UP: If tinkering with CSV files isn’t for you, try our in-app and super quick Sharp Auto Setup. Have 10+ devices to install? Bulk Device Deployment is still your quickest option, so keep reading.
1. Configure the CSV device list.
Set the ‘deviceType’ column as ‘SHARP_OSA’ or ‘SHARP_OSA_N2’ as pictured in the example CSV below.
A template CSV file can be found at ‘{PAPERCUT_MF_DIRECTORY}\server\deployment\batch\batch-devices.csv’
2. Begin device creation by running batch-create-devices in the server command.
This will kick off the device creation process, and should only take a few minutes per device (staged devices are much quicker). Running the command prompt as an administrator should avoid any issues.
C:\Program Files\PaperCut MF\server\bin\win\server-command.exe batch-create-devices “C:\Program Files\PaperCut MF\server\deployment\batch\batch-devices.csv”
Please note:
- Although Sharp OSA (HTML Browser n2.0+) and Sharp OSA devices can be deployed immediately to Site Servers, staging is not supported.
3. Check device creation progress with the get-task-status command. (OPTIONAL)
This will show you how the device creation job is progressing printer by printer (see an example in the image below).
C:\Program Files\PaperCut MF\server\bin\win\server-command.exe get-task-status
4.1 Check device status with the get-device-status command. (OPTIONAL)
This will displays any message normally found in the ‘Device Details > Status’ field.
C:\Program Files\PaperCut MF\server\bin\win\server-command.exe get-device-status {DEVICE_NAME}
4.2 Check if the device is staged with the is-device-staged command. (OPTIONAL)
This will displays TRUE if the device is staged, and FALSE if the device is deployed.
C:\Program Files\PaperCut MF\server\bin\win\server-command.exe is-device-staged {DEVICE_NAME}
5. Deploy staged device with the deploy-staged-device command.
Now your devices have been created and deployed if the ‘deploy’ column was set to ‘Y’ or ‘y’.
If the device is staged and you want to deploy it, please use the deploy-staged-device command.C:\Program Files\PaperCut MF\server\bin\win\server-command.exe deploy-staged-device {DEVICE_NAME}
6. Success!
Your devices have been created in record time and ease. Each device is now listed in your PaperCut Application Server’s Device List.
- Ricoh
- HEADS UP: This setup process uses an instructional video for step 4 onwards.
1. Configure the CSV device list.
A template CSV file can be found at ‘{PAPERCUT_MF_DIRECTORY}\providers\hardware\ricoh\remote-operation-client\device-list\devices.csv’

2. Launch the Ricoh Remote Operation Client.
You can find the launcher at ‘{PAPERCUT_MF_DIRECTORY}\providers\hardware\ricoh\remote-operation-client\remote-operation-client.bat’

3. Import the device list via the ‘File’ dropdown.

4. Continue on to the device configuration process.
The next steps are a lot easier if you see them in action, so watch this video whenever you’re ready.
- Konica Minolta
-
1. Configure the CSV device list.
Set the ‘deviceType’ column as ‘KONICA_MINOLTA_4’ as pictured in the example CSV below.
A template CSV file can be found at ‘{PAPERCUT_MF_DIRECTORY}\server\deployment\batch\batch-devices.csv’
2. Begin device creation by running batch-create-devices in the server command.
This will kick off the device creation process, and should only take a few minutes per device (staged devices are much quicker). Running the command prompt as an administrator should avoid any issues.
C:\Program Files\PaperCut MF\server\bin\win\server-command.exe batch-create-devices “C:\Program Files\PaperCut MF\server\deployment\batch\batch-devices.csv”
3. Check device creation progress with the get-task-status command. (OPTIONAL)
This will show you how the device creation job is progressing printer by printer (see an example in the image below).
C:\Program Files\PaperCut MF\server\bin\win\server-command.exe get-task-status
4.1 Check device status with the get-device-status command. (OPTIONAL)
This will displays any message normally found in the ‘Device Details > Status’ field.
C:\Program Files\PaperCut MF\server\bin\win\server-command.exe get-device-status {DEVICE_NAME}
4.2 Check if the device is staged with the is-device-staged command. (OPTIONAL)
This will displays TRUE if the device is staged, and FALSE if the device is deployed.
C:\Program Files\PaperCut MF\server\bin\win\server-command.exe is-device-staged {DEVICE_NAME}
5. Deploy staged device with the deploy-staged-device command.
Now your devices have been created and deployed if the ‘deploy’ column was set to ‘Y’ or ‘y’.
If the device is staged and you want to deploy it, please use the deploy-staged-device command.C:\Program Files\PaperCut MF\server\bin\win\server-command.exe deploy-staged-device {DEVICE_NAME}
6. Success!
Your devices have been created in record time and ease. Each device is now listed in your PaperCut Application Server’s Device List.
- HP
-
1. Configure the CSV device list.
Set the ‘deviceType’ column as ‘HP-OXPD’ or ‘HP-OXPD-PO’ as pictured in the example CSV below.
A template CSV file can be found at ‘{PAPERCUT_MF_DIRECTORY}\server\deployment\batch\batch-devices.csv’
2. Begin device creation by running batch-create-devices in the server command.
This will kick off the device creation process, and should only take a few minutes per device (staged devices are much quicker). Running the command prompt as an administrator should avoid any issues.
C:\Program Files\PaperCut MF\server\bin\win\server-command.exe batch-create-devices “C:\Program Files\PaperCut MF\server\deployment\batch\batch-devices.csv”
3. Check device creation progress with the get-task-status command. (OPTIONAL)
This will show you how the device creation job is progressing printer by printer (see an example in the image below).
C:\Program Files\PaperCut MF\server\bin\win\server-command.exe get-task-status
4.1 Check device status with the get-device-status command. (OPTIONAL)
This will displays any message normally found in the ‘Device Details > Status’ field.
C:\Program Files\PaperCut MF\server\bin\win\server-command.exe get-device-status {DEVICE_NAME}
4.2 Check if the device is staged with the is-device-staged command. (OPTIONAL)
This will displays TRUE if the device is staged, and FALSE if the device is deployed.
C:\Program Files\PaperCut MF\server\bin\win\server-command.exe is-device-staged {DEVICE_NAME}
5. Deploy staged device with the deploy-staged-device command.
Now your devices have been created and deployed if the ‘deploy’ column was set to ‘Y’ or ‘y’.
If the device is staged and you want to deploy it, please use the deploy-staged-device command.C:\Program Files\PaperCut MF\server\bin\win\server-command.exe deploy-staged-device {DEVICE_NAME}
6. Success!
Your devices have been created in record time and ease. Each device is now listed in your PaperCut Application Server’s Device List.
- Xerox
-
1. Configure the CSV device list.
Set the ‘deviceType’ column as ‘XEROX_EIP2’, ‘XEROX_EIP2_PO’ or ‘XEROX’ as pictured in the example CSV below.
A template CSV file can be found at ‘{PAPERCUT_MF_DIRECTORY}\server\deployment\batch\batch-devices.csv’
2. Begin device creation by running batch-create-devices in the server command.
This will kick off the device creation process, and should only take a few minutes per device (staged devices are much quicker). Running the command prompt as an administrator should avoid any issues.
C:\Program Files\PaperCut MF\server\bin\win\server-command.exe batch-create-devices “C:\Program Files\PaperCut MF\server\deployment\batch\batch-devices.csv”
3. Check device creation progress with the get-task-status command. (OPTIONAL)
This will show you how the device creation job is progressing printer by printer (see an example in the image below).
C:\Program Files\PaperCut MF\server\bin\win\server-command.exe get-task-status
4.1 Check device status with the get-device-status command. (OPTIONAL)
This will displays any message normally found in the ‘Device Details > Status’ field.
C:\Program Files\PaperCut MF\server\bin\win\server-command.exe get-device-status {DEVICE_NAME}
4.2 Check if the device is staged with the is-device-staged command. (OPTIONAL)
This will displays TRUE if the device is staged, and FALSE if the device is deployed.
C:\Program Files\PaperCut MF\server\bin\win\server-command.exe is-device-staged {DEVICE_NAME}
5. Deploy staged device with the deploy-staged-device command.
Now your devices have been created and deployed if the ‘deploy’ column was set to ‘Y’ or ‘y’.
If the device is staged and you want to deploy it, please use the deploy-staged-device command.C:\Program Files\PaperCut MF\server\bin\win\server-command.exe deploy-staged-device {DEVICE_NAME}
6. Success!
Your devices have been created in record time and ease. Each device is now listed in your PaperCut Application Server’s Device List.
- Fuji Xerox
-
1. Configure the CSV device list.
Set the ‘deviceType’ column as ‘FX_APEOSPORT_VI’ or ‘FUJI_XEROX_AIP’ as pictured in the example CSV below.
A template CSV file can be found at ‘{PAPERCUT_MF_DIRECTORY}\server\deployment\batch\batch-devices.csv’
2. Begin device creation by running batch-create-devices in the server command.
This will kick off the device creation process, and should only take a few minutes per device (staged devices are much quicker). Running the command prompt as an administrator should avoid any issues.
C:\Program Files\PaperCut MF\server\bin\win\server-command.exe batch-create-devices “C:\Program Files\PaperCut MF\server\deployment\batch\batch-devices.csv”
3. Check device creation progress with the get-task-status command. (OPTIONAL)
This will show you how the device creation job is progressing printer by printer (see an example in the image below).
C:\Program Files\PaperCut MF\server\bin\win\server-command.exe get-task-status
4.1 Check device status with the get-device-status command. (OPTIONAL)
This will displays any message normally found in the ‘Device Details > Status’ field.
C:\Program Files\PaperCut MF\server\bin\win\server-command.exe get-device-status {DEVICE_NAME}
4.2 Check if the device is staged with the is-device-staged command. (OPTIONAL)
This will displays TRUE if the device is staged, and FALSE if the device is deployed.
C:\Program Files\PaperCut MF\server\bin\win\server-command.exe is-device-staged {DEVICE_NAME}
5. Deploy staged device with the deploy-staged-device command.
Now your devices have been created and deployed if the ‘deploy’ column was set to ‘Y’ or ‘y’.
If the device is staged and you want to deploy it, please use the deploy-staged-device command.C:\Program Files\PaperCut MF\server\bin\win\server-command.exe deploy-staged-device {DEVICE_NAME}
6. Success!
Your devices have been created in record time and ease. Each device is now listed in your PaperCut Application Server’s Device List.
- Toshiba
-
1. Configure the CSV device list.
Set the ‘deviceType’ column as ‘TOSHIBA_V3’ or ‘TOSHIBA_V2’ as pictured in the example CSV below.
A template CSV file can be found at ‘{PAPERCUT_MF_DIRECTORY}\server\deployment\batch\batch-devices.csv’
2. Begin device creation by running batch-create-devices in the server command.
This will kick off the device creation process, and should only take a few minutes per device (staged devices are much quicker). Running the command prompt as an administrator should avoid any issues.
C:\Program Files\PaperCut MF\server\bin\win\server-command.exe batch-create-devices “C:\Program Files\PaperCut MF\server\deployment\batch\batch-devices.csv”
3. Check device creation progress with the get-task-status command. (OPTIONAL)
This will show you how the device creation job is progressing printer by printer (see an example in the image below).
C:\Program Files\PaperCut MF\server\bin\win\server-command.exe get-task-status
4.1 Check device status with the get-device-status command. (OPTIONAL)
This will displays any message normally found in the ‘Device Details > Status’ field.
C:\Program Files\PaperCut MF\server\bin\win\server-command.exe get-device-status {DEVICE_NAME}
4.2 Check if the device is staged with the is-device-staged command. (OPTIONAL)
This will displays TRUE if the device is staged, and FALSE if the device is deployed.
C:\Program Files\PaperCut MF\server\bin\win\server-command.exe is-device-staged {DEVICE_NAME}
5. Deploy staged device with the deploy-staged-device command.
Now your devices have been created and deployed if the ‘deploy’ column was set to ‘Y’ or ‘y’.
If the device is staged and you want to deploy it, please use the deploy-staged-device command.C:\Program Files\PaperCut MF\server\bin\win\server-command.exe deploy-staged-device {DEVICE_NAME}
6. Success!
Your devices have been created in record time and ease. Each device is now listed in your PaperCut Application Server’s Device List.
- Sindoh (OpenAPI)
-
1. Configure the CSV device list.
Set the ‘deviceType’ column as ‘SINDOH_OPENAPI’ as pictured in the example CSV below.
A template CSV file can be found at ‘{PAPERCUT_MF_DIRECTORY}\server\deployment\batch\batch-devices.csv’
2. Begin device creation by running batch-create-devices in the server command.
This will kick off the device creation process, and should only take a few minutes per device (staged devices are much quicker). Running the command prompt as an administrator should avoid any issues.
C:\Program Files\PaperCut MF\server\bin\win\server-command.exe batch-create-devices “C:\Program Files\PaperCut MF\server\deployment\batch\batch-devices.csv”
3. Check device creation progress with the get-task-status command. (OPTIONAL)
This will show you how the device creation job is progressing printer by printer (see an example in the image below).
C:\Program Files\PaperCut MF\server\bin\win\server-command.exe get-task-status
4.1 Check device status with the get-device-status command. (OPTIONAL)
This will displays any message normally found in the ‘Device Details > Status’ field.
C:\Program Files\PaperCut MF\server\bin\win\server-command.exe get-device-status {DEVICE_NAME}
4.2 Check if the device is staged with the is-device-staged command. (OPTIONAL)
This will displays TRUE if the device is staged, and FALSE if the device is deployed.
C:\Program Files\PaperCut MF\server\bin\win\server-command.exe is-device-staged {DEVICE_NAME}
5. Deploy staged device with the deploy-staged-device command.
Now your devices have been created and deployed if the ‘deploy’ column was set to ‘Y’ or ‘y’.
If the device is staged and you want to deploy it, please use the deploy-staged-device command.C:\Program Files\PaperCut MF\server\bin\win\server-command.exe deploy-staged-device {DEVICE_NAME}
6. Success!
Your devices have been created in record time and ease. Each device is now listed in your PaperCut Application Server’s Device List.
- Dell (AIP)
-
1. Configure the CSV device list.
Set the ‘deviceType’ column as ‘DELL’ as pictured in the example CSV below.
A template CSV file can be found at ‘{PAPERCUT_MF_DIRECTORY}\server\deployment\batch\batch-devices.csv’
2. Begin device creation by running batch-create-devices in the server command.
This will kick off the device creation process, and should only take a few minutes per device (staged devices are much quicker). Running the command prompt as an administrator should avoid any issues.
C:\Program Files\PaperCut MF\server\bin\win\server-command.exe batch-create-devices “C:\Program Files\PaperCut MF\server\deployment\batch\batch-devices.csv”
3. Check device creation progress with the get-task-status command. (OPTIONAL)
This will show you how the device creation job is progressing printer by printer (see an example in the image below).
C:\Program Files\PaperCut MF\server\bin\win\server-command.exe get-task-status
4.1 Check device status with the get-device-status command. (OPTIONAL)
This will displays any message normally found in the ‘Device Details > Status’ field.
C:\Program Files\PaperCut MF\server\bin\win\server-command.exe get-device-status {DEVICE_NAME}
4.2 Check if the device is staged with the is-device-staged command. (OPTIONAL)
This will displays TRUE if the device is staged, and FALSE if the device is deployed.
C:\Program Files\PaperCut MF\server\bin\win\server-command.exe is-device-staged {DEVICE_NAME}
5. Deploy staged device with the deploy-staged-device command.
Now your devices have been created and deployed if the ‘deploy’ column was set to ‘Y’ or ‘y’.
If the device is staged and you want to deploy it, please use the deploy-staged-device command.C:\Program Files\PaperCut MF\server\bin\win\server-command.exe deploy-staged-device {DEVICE_NAME}
6. Success!
Your devices have been created in record time and ease. Each device is now listed in your PaperCut Application Server’s Device List.
Enhanced MFD Deployment via PaperCut UI (20.0)
Stage the devices first, review and deploy them later
This feature allows the user to stage MFDs in PaperCut MF pre-configured without consuming precious embedded licenses. Then the user can preview staged MFDs in PaperCut MF’s admin console UI and correct any mistake before final deployment.
Deploy or Stage devices via PaperCut UI
If you allow MFDs to be staged and previewed via PaperCut MF’s UI, but still require a server command to stage them. Why don’t allow them to be staged through graphical user interface in the first place?
That’s why we created the user-friendly wizard in PaperCut MF. It empowers the user to create staged MFDs or to deploy them immediately all through the graphical user interface, without fiddling a single line of command.
Benefits
- Pre-configure MFDs prior to their delivery
- Preview and correct MFD settings before deployment
- Stage or deploy MFDs via graphical user interface
- Preview CSV rows in a table
- Preview any mistake of the CSV in a table with helpful error messages