Introduction
There are a number of ways to allow Linux clients the ability to print through your printer, however sometimes the best and most workable method is not clear. This article is designed to provide an overview of the options available when printing from Linux, via shared printers on a Windows Server.
What is CUPS?
CUPS was originally an acronym for Common Unix Printing System, and over the years has officially become simply CUPS. It is natively a print spooling platform used for the Internet Printing Protocol on Linux and Unix systems. It also includes support for printing via Line Printer Daemon (LPD) and Server Message Block (SMB via SAMBA) protocols. Running this powerful daemon opens the door to a variety of printing options on Linux.
*Daemon is a computer termed coined originally for Unix systems referring to background processes that remained running to provide a service.
Methods Available
There are a several methods of allowing the use of Windows Server shared printers, to your Linux clients. Below is a summary of two methods covered within this article.
Printing via LPD (Line Printer Daemon)
This is typically the easiest, and most typical option available.
Primary Advantages / Disadvantages:
- Submits print job as the user logged in and printing
- Print Job submission includes document title
- Simple setup and installation of printer
- Lacks common authentication issues that can occur when attempting to use SAMBA
Printing via Windows Print Sharing (SMB):
This printing allows connection straight to the Windows Share and has the best integration with Active Directory, though in some cases can be difficult to support. It uses SAMBA to implement connection to Windows File and Print Sharing.
Primary Advantages / Disadvantages:
- All print jobs get submitted as the user that initially installed the printer, rather than the user actually printing
- Slightly more complex installation
- Print job submission does not include document title
- Windows credentials are stored in clear text as part of the Device URI (defined later in this guide)
Obtaining & Installing CUPS
There are usually several methods available for obtaining and installing CUPS on your Linux system. Below is a summary of each.
Example:
Installing CUPS by adding Printing Support within the built in package collections on Fedora15
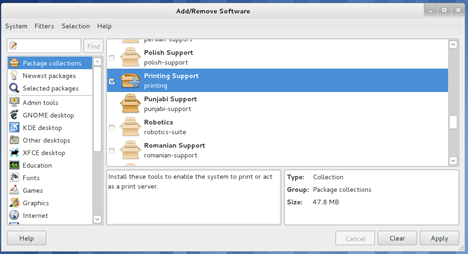
Downloading & Installing an RPM:
If CUPS is not included, and is not easily installable via the built in packages, then the RPM file for CUPS can usually be downloaded and installed from your distribution’s support site, and possible other third party sites. It is important when locating and downloading, to take two things into consideration:
- Do I have all of the pre-requisite packages downloaded and installed?(Common pre-requisites include: gcc, libjpeg, libjpeg-devel, libpng, and many, many more. See www.cups.org for a complete pre-requisite list)
- Am I downloading the correct package for my version and architecture?(i.e. 0x86 or 0x64? Linux kernel version?)
Downloading & Compiling the Source:
A final option is download, compile and install the source code directly downloaded from www.cups.org. This option requires much more advanced Linux and development knowledge, and is beyond the scope of this guide.
Introduction to the CUPS Administrator:
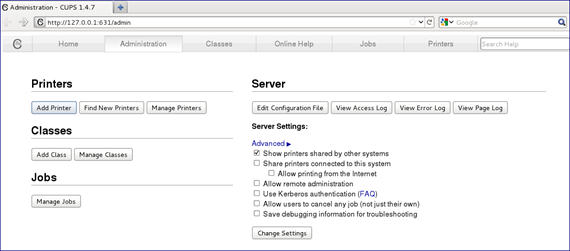
The modern CUPS administrator uses a Web UI and has become increasingly easy and intuitive to use. The below provides a brief introduction to logging in and mentions the areas we will be using in this guide.
The CUPS Web UI:
The user interface for cups is accessed via an internet browser using the following url. You may be required to provide root access before accessing this, or making any sensitive changes.
http://127.0.0.1:631
After entering the address, a web page should load allowing for easy administration. The section will be focusing on is limited to Printers.
The Server section should not be confused with anything used to print through your Windows server, this is used for setting up this Linux machine as a print server.
The CUPS Configuration Files:
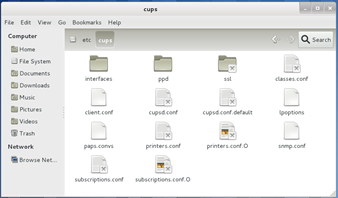
Your CUPS settings , configuration and drivers are all located within the /etc/cups directory. The primary configuration file is named cupsd.conf. Manually editing these files is beyond the scope of this guide, but it is good to know they are there.
Printing Via LPD (Line Printer Daemon) – Part I:
This first part covers specifically how to enable the LPD service within Windows. This varies slightly between operating system. The below steps specifically apply to various server operating systems.
Configuring your Windows Server to provide LPD Printing (Windows 2000 / 2003 / XP):
1. Open Add/Remove Windows Components within Add/Remove Programs. Within this location Other network File and Print Services
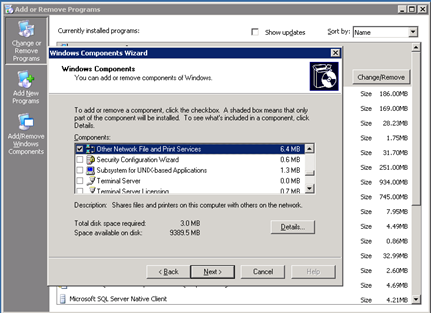
2. Click on the [Details] button and within details check Print Services for Unix and click OK and then [Next] to install these components.

3. Afterwards Windows will install this service. You may be prompted for your Windows Installation Media.
Configuring your Windows Server to provide LPD Printing Services (Windows 2008 / 2008 R2):
1. Run Server manager and within Roles locate the Print and Document Services role.
2. Within that Role, click the Add Role Services. Here you add the LPD Service.

3. Once the role has been installed, you are ready to install printers onto your Workstation.
Configuring your Windows Server to provide LPD Printing Servives (Windows Vista / 7):
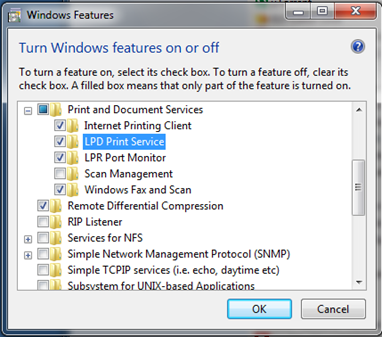
1. Open Control Panel > Programs and Features. Within this dialog, click the [Turn Windows Features on or off] on the left hand side.
2. The Windows Features dialog will open. Locate Print and Document Services and enabled the item named LPD Print Server and then click [OK]
Printing via LPD (Line Printer Daemon) – Part II:
This covers the actual installation of the device on Linux. You will need the following pieces of information prior to installing the printer.
- The host name or IP address of the Windows server that you are sharing your printer from, and have installed the LPD Printing Server / Print Services for Unix on.
- The share name of the printer you wish to install. It is recommended that the printer not contain any spaces in its share name.
Adding an LPD Printer using CUPS Web UI:
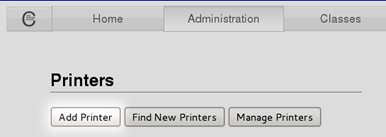
1. Open the CUPS administration site and choose ADD Printer
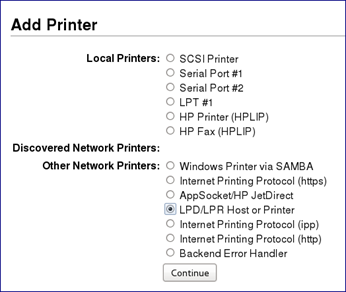
2. Next you will be prompted to choose the type of printing. Here you will want to choose LPD/LPR Host or Printer. In some situations you may encounter needing to directly enter a device URI. In this case skip ahead to step 3.
3. Now you will need to enter a properly formatted *Device URI to connect to your shared printer. The below explains each part for an LPD Printer.
*Device IRL:
This is a Universal Resource Identifier that is a string used to indicate the protocol, device, and other settings associated with a printer connection when using CUPS.
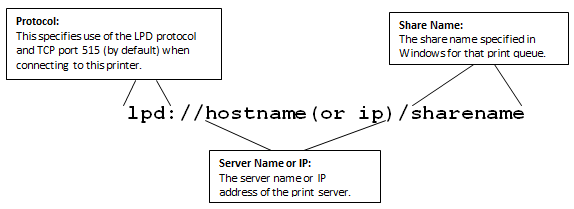
Final String entered into the CUPS Add Printer Wizard:


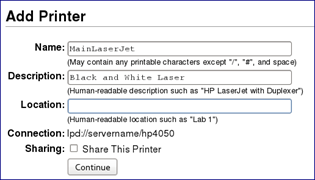
4. After specifying the Device URI, you will need to name your printer. This is how end users will see this device in their printer list.
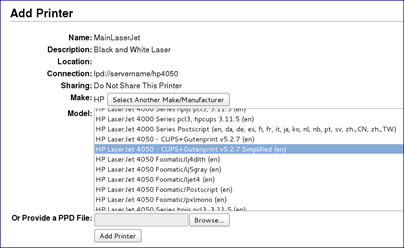
5. Selecting a driver will be your next step. Most printers that have been out for a while provide a very good choice of drivers. If your Linux distribution does not seem to include the drivers for your device that you need, please take a look at the section labeled Obtaining Linux Drivers to get access to an appropriate PPD (Postscript Printer Description) file.
6. Once the printer is added, it should be selectable in applications. When viewing the queue in Windows, the job’s owner will list as the user logged into Linux at the time or printing, combine with the source IP.

Printing via SMB (Windows File & Print Sharing)
This covers the actual installation of the device on Linux using simply the sharing. It does not require the LPD Printing Service / Print Services for Unix be installed on your Windows Server. You will need the following pieces of information prior to installing the printer.
- The host name or IP address of the Windows server that you are sharing your printer from.
- The Windows Domain name you will be authenticating against. (not necessary for workgroups)
- Valid Windows credentials for connecting and printing to the device. Typically these will be domain credentials, but can also be local users on the print server.
- The share name of the printer within Windows.
Installing a Printer via Windows Printer Sharing:
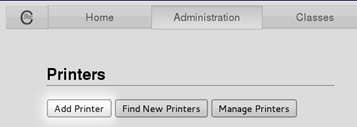
1. Open the CUPS administration site and choose Add Printer
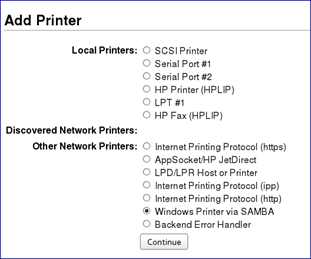
2. Next you will be prompted to choose the type of printing. Here you will want to choose Windows Printer via SAMBA. In some situations you may encounter needing to directly enter a device URI. In this case skip ahead to step 3.
3. Now you will need to enter a properly formatted *Device URI to connect to your shared printer. The below explains each part for an SMB share
*Device IRL:
This is a Universal Resource Identifier that is a string used to indicate the protocol, device, and other settings associated with a printer connection when using CUPS.
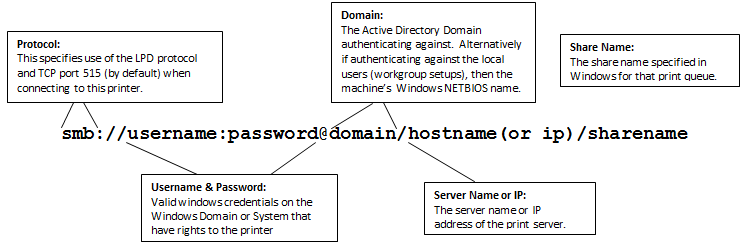
Final String Entered into the CUPS Add Print Wizard:

4. After specifying the Device URI, you will need to name your printer. This is how end users will see this device in their printer list.
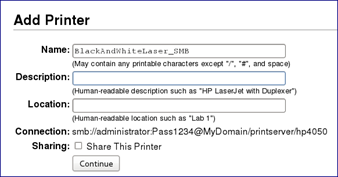
5. Selecting a driver will be your next step. Most printers that have been out for a while provide a very good choice of drivers. If your Linux distribution does not seem to include the drivers for your device that you need, please take a look at the section labeled Obtaining Linux Drivers to get access to an appropriate PPD (Postscript Printer Description) file.
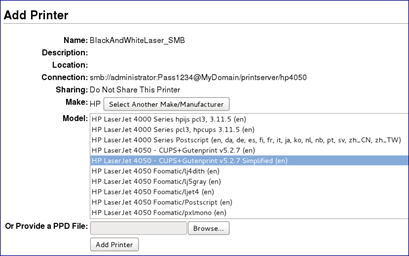
6. Once the printer is added, it should be selectable in applications. When viewing the queue in Windows, the job’s owner will list as the user specified in the Device URI, and not as the user logged in. Also no document title will be available.
You can see the difference between using LPD (Job 1) and SAMBA (job 2) by viewing the two jobs in the queue. Both were submitted as John Doe, but the second cannot be tracked or accounted for properly.

Obtaining Linux Drivers
Most distributions of Linux include a rich set of drivers, especially for common printers, or printers that have been on the market for any substantial length of time. Drivers come in the form of PPD Files. Below are a few explanations on what these are and where to help find drivers.
What is the PPD File?
The PPD file, or *PostScript Printer Definition file is simply a simple text file used to invoke what features are to be enabled for a PostScript print job. Originally CUPS only support printers that could understand the PostScript printing language.
Today a large variety of printers can be supported, by enhanced filters that allow the print jobs to be translated into many other languages such as PCL and ESCP/2 to name a couple.
*Postcript is a language, commonly used to describe the contents, layout, sizing orientation and more of items on a page. It is commonly categorized as Page Description Language.
Printer Manufacturer:
If your printer manufacturer provides a CUPS compatible, then this is typically the best option and will provide the most reliable output to your printer.
CUPS:
The CUPS website at www.cups.org has extensive resources and links to obtaining supported drivers for a variety of manufacturers and models.